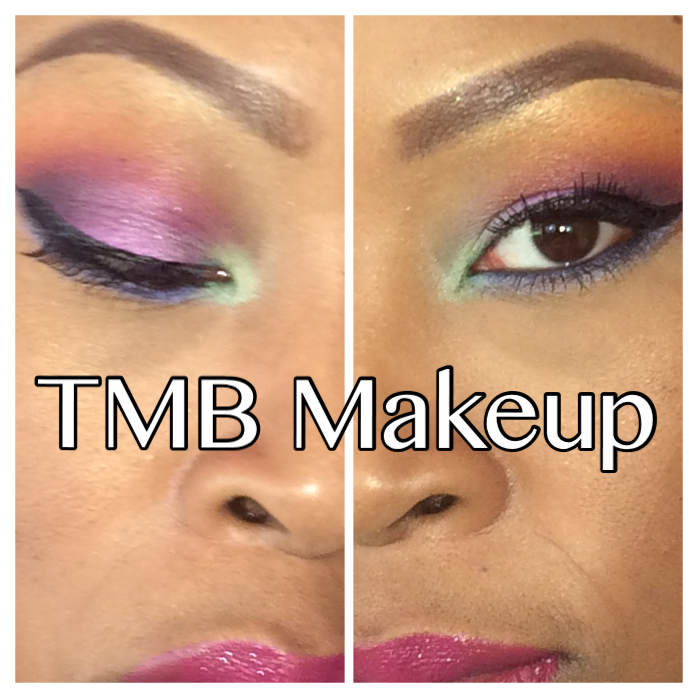
Colorful {BUT WEARABLE} Spring / Summer Makeup
Summer is finally here! I mean, she’s been here already
unannounced – so why wait for the big announcement to start rocking some of the
hottest colors? But not just your clothes, rock out some cool eye shadow and
lip combos that will have you turning heads every where you go! Keep on reading
to see how you can get this colorful, bold, but very wearable makeup look!
Inspiration Alley
– Before you read how I created this look, I want to share with you my inspiration
for the color choices. Pantone, LLC is the company responsible for providing
the color palette for every season and a color matching system used for a
variety of industries. From graphics and art to plastics, Pantone offers custom
color services to corporate management, art directors, automotive,
pharmaceutical and of course, beauty and fashion. Every season, I create several looks with the
Pantone color palette. As a makeup
artist in the beginning stages of my career, I use these Pantone opportunities
as color theory lessons for myself. So now you know why I chose the colors; I will
also try to include my decisions for color placement. This look focuses on four colors from the
spring summer 2014 report:
Radiant Orchid
Hemlock
Celosia Orange
Palacio Blue
Step 1: Always begin
your makeup routine with a good cleansing, toning and moisturizing regiment.

Step 2: For colorful
eye shadow looks, it is best practice to start with the eye makeup first, clean
up fall out, apply foundations and concealers/correctors or under eye
highlight, set with powder then finish the under eye makeup. Fall out can be heavier if you’re a beginner
or if you have darker skin tones because you are working hard to get that color
on the eye. So, frame the eyebrows for step two, then begin to prime your eyelids
with a primer to prevent creasing and a white base to help the colors appear
better. Blend to create a smooth surface.

Step 3: Begin with
the “Celosia” orange shade (matte). Place
this color below the brow bone and above the crease. Using circular and windshield wiper motions
keep this color on the outer 2/3rds of the eye.
You always want the deeper color on the lid, since I knew I wanted
purple shade there, orange
Step 5: IF you do not
have a single e/s that is close to the “Hemlock” inspired shade, then build
one. Use a lime, bright green shade
first, then layer a light, sky blue on top. Use a small detailing brush to
create an inner “V” that extends up onto the inner third of the lid and down to
the water line. The inner corner
highlight does not ALWAYS have to be a shimmery finish, but one that is light
in color to attract lighting to the eye. We know that shimmer finishes reflect
light differently than a matte shadow, but any “tinted” hue is essentially
lighter than the true color because a tint is adding white to a color. Unlike the terminology of “tints” in regards
to windows, in color theory this term has a different meaning.

Step 6: Add the “Radiant Orchid” inspired purple
shade (shimmer) on to the remaining space on the lid. Gently place right underneath the transition
shade, slightly over lapping. If you
over lap too much go back in with the transition color to bring the gradient
effect back to the look.
 Step 7: Finishing Touches: Spruce up the look by adding a slight dimension of depth by adding a
black or dark blue or purple shadow on the outer “V.” Connect the inner “V” color to the entire eye
by blending upward to the head of the brow.
Add mascara to top lashes, winged liner (optional depending on eye
shape), and lashes.
Step 7: Finishing Touches: Spruce up the look by adding a slight dimension of depth by adding a
black or dark blue or purple shadow on the outer “V.” Connect the inner “V” color to the entire eye
by blending upward to the head of the brow.
Add mascara to top lashes, winged liner (optional depending on eye
shape), and lashes.
Step 8: Line below the
water line with a purple e/l. Set the
liner with a combination of colors (light, sky blue, shimmer purple) to get
something close to the “Palacio” blue inspired color. Then add black eyeliner or shadow to the
water line to intensify the look. Add mascara to bottom lashes.


Lips: Prep and prime lips. Line and fill in with a fuchsia
pink shade and add a matte pink lip color.
As always, I hope you have learned something and don’t be
afraid to rock these colors! Remember, inner beauty is your TRUE
foundation! Makeup does not make you!!!
Want a complete list
of the products I used? Check it out!
Product List
M.A.C Paintpot in Painterly
Rimmel London Kohl Eyeliner in Pure White
BH Cosmetics 1st Edition 120 Color Palette
Urban Decay 24/7 e/l pencil in Ransom
OCC Lip Tar Matte in Clear
LA Girl Endless, Semi permanent auto lip liner in 336 Pink
Parfait
OCC Lip Tar Matte in Yaoi
Comments
Post a Comment
Leave a comment and share your thoughts!!!